Materials
Hook: Tiemco 900BL #12-#20
Thread: Uni-Thread 8/0 - black/brown
Head: Fine & Dry - black/rusty brown
Hackle: Dry fly quality hackle - brown, Parachute style
Abdomen: Fine & Dry - black/rusty brown
Shellback: Elk/Deer hair - black/rusty brown
Post: Elk/Deer hair - black/rusty brown
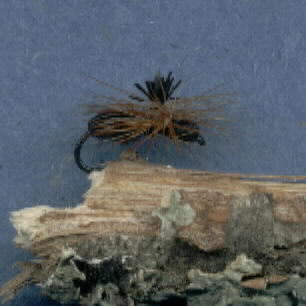
The Perfect Ant has been a very successful pattern in the Sierra waters of California
and Nevada. Ralph Cutter, the originator, describes the fly in his book "The Sierra
Trout Guide".
Tying Instructions
1. Attach the thread behind the eye of the hook and wrap backwards to the about the 2/3
point on the shank.
2. Clip a small (about 15 hairs for a #18) bunch of Elk hair. Remove the under fur and
short hairs. There is no need to stack it because both butts and the tips will be trimmed.
I prefer to use Elk because it's a much more durable material than Deer.
3. Lay the Elk hair over the top of the shank with the butts towards the eye. Secure it
with several firm wraps.
4. With your left hand, gather the Elk hair by the tips and gently pull backward and
slightly upward as you wrap toward the bend of the hook. This keeps the Elk on top of the
hook and prevents it from spinning. Continue wrapping tightly to just past the straight
section.
5. Trim the butts of the Elk.
6. Dub a short (1/3 shank), round abdomen. The thread should be at the 2/3 point.
7. Using your right hand, gather the Elk hair by the tips and gently pull forward over the
abdomen (humpy style) and secure with several firm wraps. Again, a slight upward pull will
keep the Elk on top of the shank.
8. Still holding the Elk, wrap forward to about the 1/2 point on the shank. Do not allow
the hair to spin. The Elk should be wrapped tight enough to compress it. This forms the
narrow pedicel or "waist" of the ant.
9. Now, gather the Elk with your left hand and pull it upward into a vertical position.
Advance the thread forward, just in front of the Elk and build up several wraps of thread.
Make one loop around the post then over the shank behind the post. Secure with several
firm wraps around the shank. The post should now stand upright.
10. Begin wrapping the thread around the post, working upward about 1 to ˝ hook eyes
above the shank. (You may need to hold the Elk upright with your free hand). Continue
wrapping back down the post all the way to the shank. A good solid post is the key to
tying
11. Advance the thread to just behind the eye of the hook. Dub a small round head working
back toward the base of the post. Continue wrapping the back to the base of the post.
12. Select a dry fly quality hackle feather. With parachute style hackle I prefer to use
high quality saddle hackle. I find that they are easier to work with because they are
longer and the stems are generally thinner and more supple.
13. Remove a section of barbules from butt of the hackle. Lay the hackle feather over the
shank just in front of the post. The shinny side should be up, the tip facing toward the
bend of the hook forming about a 45 degree angle with the shank. Secure the butt to the
shank with several firm wraps. Trim the butt if necessary. Apply a small drop of thin head
cement at the base of the post.
14. Begin winding the hackle clockwise around the post. The first turn should spiral
upward to the top of the thread base on the post. Then work down the post with each
subsequent turn. For quiet waters 2-3 turns are sufficient. Use 4-6 turns for fast or
choppy water.
15. After the last turn of hackle is completed, pull the hackle feather over the shank in
front of the post. Clip your hackle pliers on the feather and let it dangle. With your
left hand, gather the hackle fibers and pull them backward. Still holding the hackle
fibers out of the way, make several firm wraps of thread to secure the hackle to the
shank. Trim the butt of the hackle feather.
16. Again, holding the hackle fibers out of the way, make about 4 wraps with a whip
finisher, trim the thread.
17. Trim the post just above the hackle. As an alternative, you can trim the post 1/2 to 1
shank lengths long - this make the fly easier to sight.
18. Apply thin head cement to the base of hackle and on the underneath of the shank below
the post.
19. Complete.
Fishing Instructions
The fly generally fished dead drift, under overhanging bushes or trees. However, if you
don't get a response, try a couple of gentle twitches. Because ants that have fallen into
the water often become submerged, try attaching a couple of split shot and drifting the
ant subsurface also.
Variations
I usually tie the fly in your basic black with brown hackle This is a grea imitation for
the Carpenter Ants of the high Sierra. The rusty brown color scheme makes for a good red
ant imitation.
The one drawback to the fly is that it can be very difficult to see in the shadows or
low light situations. For those situations I like to tie it with a white calf post. The
calf hair post is tied in first and the Elk is trimmed just behind the post.
t