Check it Out
Headwaters:
a fish and angling art show
Here is a great selection of Hunting & Fishing magazines.
With 1200 Magazines to choose from you just can't go wrong

Help support this site by supporting our affiliates
All intellectual property and Pictures Copyright© of Robert Morger 1999. No reproductions of any material on this site is permitted without the express permission of the owner. All rights reserved.
The Onelist logo is a copyright of Onelist,Inc Copyright © 1998-1999, ONElist, Inc. All Rights
Reserved.
If you have suggestions or questions please contact rmorger@juno.com
Powered by counter.bloke.com
Orange and Black Steeve's TransparAnt
Jerry Caruso
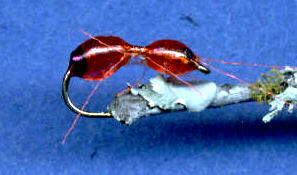
| Jerry Caruso Black and Red(TransparAnt) Ingredients: Hook: size 12 Shrimp/Caddis
Tying Instructions: Debarb hook. Place hook in vise, etc. Tie in strand of the Holographic tinsel. Wrap tightly on hook shank back to and halfway down bend, then forward to eye. Tie off and trim excess Make a few wraps with to form a small head. Put a touch of super glue on shank and slide on Orange seed bead. Let dry. Now slide on two orange seed beads and the Gun Smoke Gray bead so that they're right behind the "head" Add a touch of super glue to the back part of the hook and slide the gray bead back. Hold in place till glue sets(a couple of seconds). Add a touch of super glue to shank and slide the orange beads back. Take two strands of the orange FluroFibre and tie in a < in front of the head. Whip finish and trim excess. Antennae should be body length. Now mix up some 5 minute epoxy. You really need a rotary vise to do this right. While rotating the fly apply a small amount of epoxy to the back beads. Just enough to cover the beads and give the body a taper. Repeat the process for the front bead. Make sure you "lock" in the antennae with the epoxy. Keep the center of the hook free of epoxy. Rotate 3 to 4 minutes until epoxy has set. Set aside to dry. Legs: take three strands of orange FluroFibre and lay on a piece of paper or foil to form a >|<. I used Flex Loc to hold them together. When the they legs have dried. Turn fly upside down and center on the hook shank. Use a touch of glue to hold in place. When set cover with a minuscule drop of epoxy. This can be a pain. The quick and easy way is to attach your thread to center of shank and tie in a piece of hackle. For this I'd use either Orange, brown or black. Make a couple of wraps and tie off. Optional, trim hackle on top and bottom. Fishing: I like to fish it wet as a trailer behind a larger dry, or under a strike indicator If you use a good quality dry fly hackle for your legs. The pattern in smaller sizes can be fished as a dry. If you don't want to use seed beads. You can build a tapered body and head of thread and do the epoxy over that. |