Check it Out
Headwaters:
a fish and angling art show
Here is a great selection of Hunting & Fishing magazines.
With 1200 Magazines to choose from you just can't go wrong

Help support this site by supporting our affiliates
All intellectual property and Pictures Copyright© of Robert Morger 1999. No reproductions of any material on this site is permitted without the express permission of the owner. All rights reserved.
The Onelist logo is a copyright of Onelist,Inc Copyright © 1998-1999, ONElist, Inc. All Rights
Reserved.
If you have suggestions or questions please contact rmorger@juno.com
Powered by counter.bloke.com
Realistic Ant
Tied and originated by Jerry Schrader
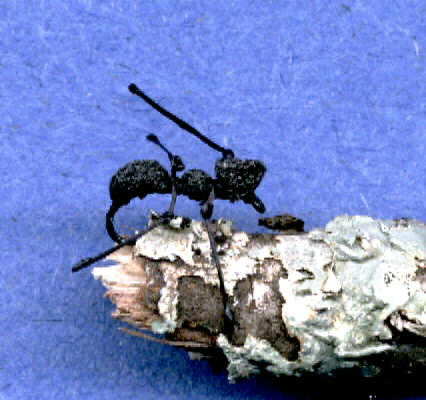
| The Realistic Ant By Jerry Schrader jschrader@aol.com
The Realstic Ant, history When my ant is fished as a dry, I am loath to apply the cement that will make this fly indestructible, as the added weight affects flotation. But if you don't mind the added weight, it also fishes well wet, and will be accompanied by many rapid fish flashes if allowed to sink. I have watched a brown trout follow this ant for ten yards as it floated in the film of the Swift. While he pursued the floating fly he examined circled around it for 300 degrees, never more than 3 inches away. After it finally passed inspection, he casually sipped in the fly, only to discover to his dismay, that he had been once again duped! At the set of the hook, he exploded on the surface peeling off many yards of line, upsetting the pool and several other fishermen who were convinced that I must be using bait. The Recipe for the Realistic Ant. Hook… Tiemco #102y size 19 this special hook was developed as a caddis fly hook.
It has a wide gap and is down eye, 1x fine and black which helps to hide it in this
pattern. It is available from Feather Craft.
Place the hook in the vise and wrap the thread to the middle of the bend of the hook. Cut a 45-degree angle at the base of the foam cylinder (to reduce bulk) and tie in this end to the hook cylinder extending rearward. Now wrap the thread forward to the middle of the straight part of the hook and bend the cylinder of foam forward and wrap the thread over the foam and make a few tight wraps to form the abdomen of the ant. Wrap the thread forward a few turns under the foam then wrap over the foam to form the thorax and head of the ant. Wind the thread back toward the rear of the hook to the beginning of the thorax at the first segment. Now make a pair of legs by making two over hand knots approx 3/32 apart in a piece of heavy monocord about 3 or 4 inches in length with the natural curl left. Use the natural curl of the mono cord to help form the loops for this simplest of knots. A small pair of right angle tweezers is invaluable for this task. Do not lock the knots too tightly as it will straighten the monocord instead of the producing the intended right angle bend. You will end up with a tight U of monocord with a knot at the two corners. Trim this pair of legs to about ľ inch and tie them in at the front of the abdomen at the first segment. Cross tie to hold them in place and use the tweezers to adjust the position. Wrap the thread forward to the front segment and tie in the front pair. Bring the pair of legs together and trim to the correct length, approximately one body length. Don't worry if they don't sit perfectly, it won't really matter when fishing. Knotting the legs can be maddening, and I never do it the same twice. I like to leave the legs a little long as I think that it increases the bugginess of the fly. |