|
Check it Out
Headwaters:
a fish and angling art show
Here is a great selection of Hunting
& Fishing magazines.
With 1200 Magazines to choose from you just can't go wrong

Help support this site by supporting our affiliates
All intellectual property and Pictures Copyright� of Robert Morger 1999. No reproductions of any
material on this site is permitted without the express permission of the owner. All rights
reserved.
The Onelist logo is a copyright of Onelist,Inc Copyright � 1998-1999, ONElist, Inc. All Rights
Reserved.
If you have suggestions or questions please contact rmorger@juno.com
Powered by counter.bloke.com
| |
Feature Tying Tips
Submitted by
Jim Herbold
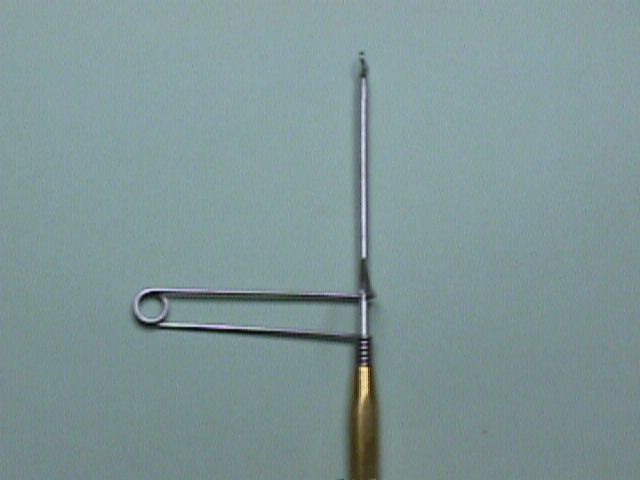
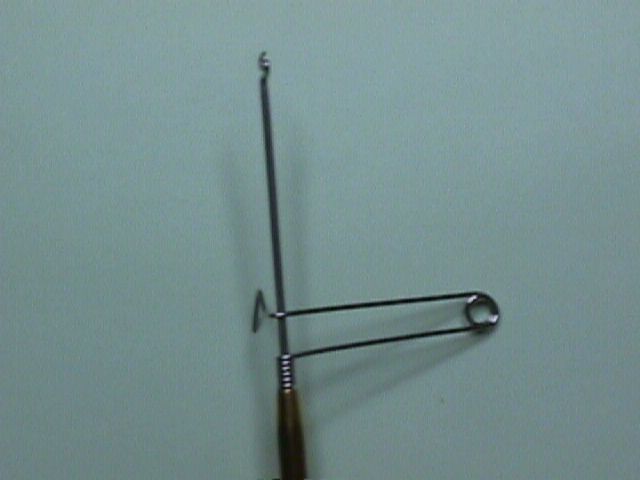
Modifying a Thompson Whip Finisher to
make it work better
Attached you will find three views of the modifications.
Figure 1 shows the tip has been twisted back into alignment
with the shaft. In the unmodified tool, the tip is at a 90 degree angle to the shaft.
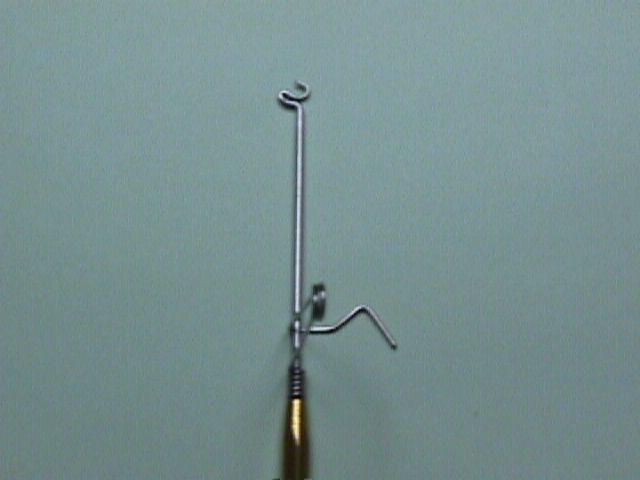
Figure 2 is probably the most meaningful. It
shows all the important features. Notice the bottom bend of the "s" has been
squashed. In this picture, the tool is laying flat on the (newly) bent part of the spring
wire. Notice the "s" is laying flat as well.
Compare this picture to a Matarelli, and you will see the
Matarelli's tip bend and the "hump" that holds the thread loop are in the
same relative alignment.
Figure 3 show the modified tool in a three point
stance, the wire loop end, the wire tip end, and the handle end. In this view, the 90
degree bend of the spring wire is very easy to see.
If you don't know how to use a Matarelli, get an
experienced tier to show you. One demonstration and one or two practice tries and you'll
have it. If you do know how to use a Matarelli, it should be evident how to use the
modified tool.
Good tyin'
jim
|
Submitted by
Pat Damico
| This may be well known, but is very helpful to me. I tie a
lot of Saltwater patterns and have a small tube of super glue constantly in hand to use
sparingly to secure lead eyes, hair and other materials to the hook. Synthetic hair
especially will behave better if a small drop is added when the first few wraps of thread
are applied. Materials will last longer. |
Submitted by
Pat Damico
| To make a drying wheel for epoxy application, pick up a
rotisserie from a backyard grill and mount a piece of styrofoam to the shaft. Mount it on
a board and plug it in near your bench. |
Submitted by
Brian Cole
| Here's a tying trick that I learned in a fly tying class.
It requires a simple modification to your whip finisher tool: using a jewelers file cut a
small "V" notch in the end of the handle. One side of the notch should form a
knife-edge. Usage: When you have completed the whip finish on your fly, just flip the
tool over, catch the thread in the notch and gently slide the tool down thread. When the
end of the tool reaches the head, pull the thread gently, increasing the tension until the
thread it cut.
It’s been a great help to me – it seems that my scissors are buried someplace
on my bench by the time I complete a fly! It’s also much safer than using scissors
because there’s no danger of cutting off part of the hackle, wing, etc … Image |
Submitted by
Don Chattin
| When you need a few strips or strands of
mylar,flashabou,etc when you buy a pack of material, just cut the corner of the pack
and when you need a few strands pull them out through the corner and cut them off at the
top..this way the material stays in the bag,and doesnt get crimped, tangled, come
loose, dirty, ....etc... |
|